I listed his projects by subject. You can skip over them or read only what interests you. But I tried to share some details for those that really do have an interest.
Windlass/gypsy
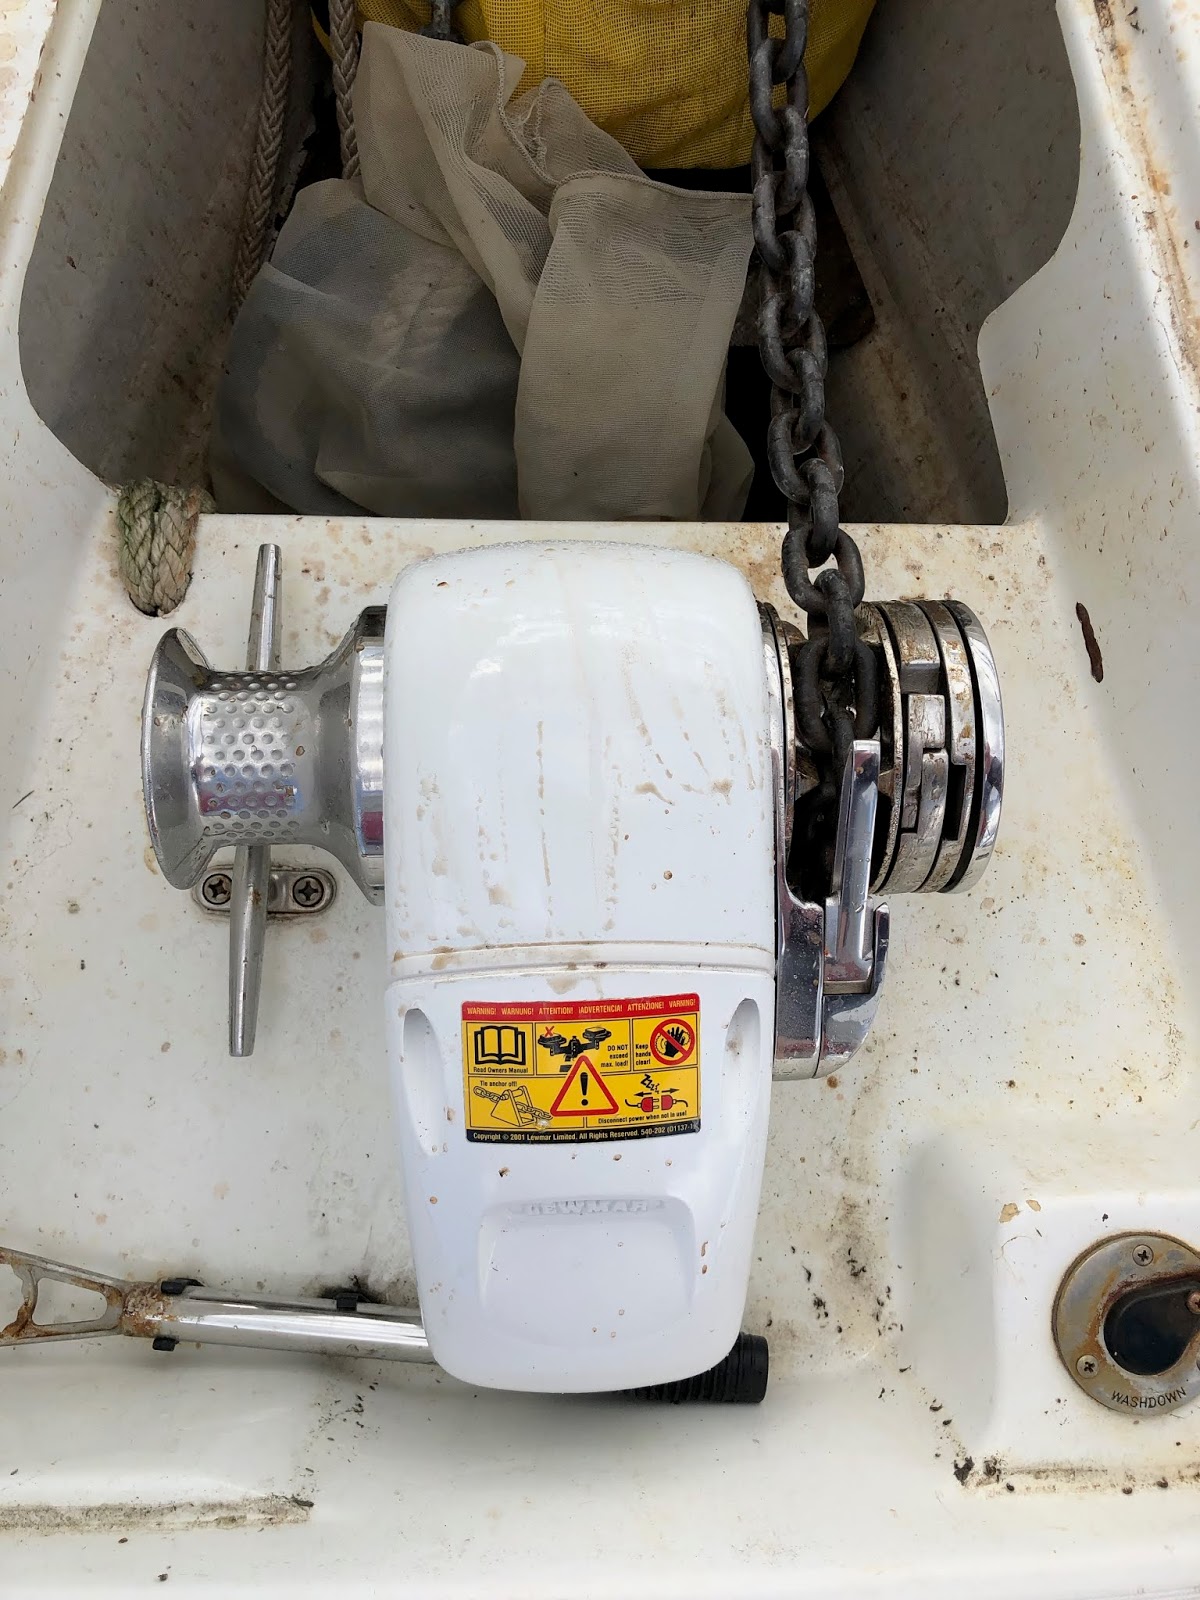
Back in December, I started the windlass/gypsy saga. This raises and lowers our anchor chain. When we bought a new windlass and gypsy in June 2018, it never seemed to work smoothly. Dave figured out that it came with the wrong size gypsy (package had been opened when we received it). We need 3/8 inch and the one we had was 5/16 inch.
In December, he talked to West Marine. They wanted him to replace the entire windlass and gypsy, which is a lot of work. They called corporate, and they were ok with just sending him a gypsy. In January, he received the gypsy. This box had been opened. So he checked it before leaving the store. The box said 3/8 inch, which we need for our chain. In the box was a gypsy for 5/16 inch. Then Dave saw on the outside of the box, in one place, someone had scratched out 3/8 and written with pen 5/16. GRRRRRR!!
Back to the search. They could only find one 3/8 gypsy, and it was in England. After waiting a week to only find out when it was going to be shipped, Dave told them to go ahead and order the windlass and the gypsy. He would do the extra work to replace the windlass too if that was what it was going to take. He received the correct combination and did the work. He returned the used mismatched windlass and gypsy, minus a few parts that he needed or forgot. He tried it out in the marina, but with only a few feet of chain. It seemed to work great. The real test will be when we are at anchor. (in case you miss it later on, it did work great)
 |
| Dave working on the gypsy |
 |
| full view of windlass, gypsy with chain to the anchor |
 |
| the windlass with the gypsy on the right side |
The ELCI is an “ interrupter”, similar to a ground fault circuit interrupter in a bathroom. It reads what power is going through it, and if any current gets misdirected, it will signal the circuit breaker in the interrupter to open.
Dave installed the second isolation transformer. The first one was installed in August for our “house power”. The second one was for the air conditioning/heating. The transformers are only needed when we are connected to shore power.
One part of this project was mounting the transformers. By the way, they weigh 60 pounds each. The second part was running the wiring to connect everything. There are two outlets on the stern. One is for the “house power” and one is for the air conditioning/heating. The original wiring ran from the outlets to the circuit breaker panels for each.
Dave had to run the wiring to connect the outlets to their respective ELCI and transformer, then to the correct circuit breaker. There were no clear directions on where to install the ELCI, before or after the transformers. He decided to try the easiest way first, which was to connect the ELCI after the transformers. But this would trip the circuit breaker in the interrupter. Then he reinstalled the ELCI before the transformers and everything worked great. The wiring ran from each outlet on the stern to each ELCI and transformer, then to each circuit breaker panel mid ship. Tedious work. His electronics background sure comes in handy.
 |
| ELCI |


 |
| isolation transformers |
We still needed some tweaking on our SSB radio. Dave did some trouble shooting to pinpoint the problem. He discovered that the tuner was shot. He had to order a new one, wait for it to arrive, then install it. He also hooked up a hand held GPS that will have a latitude and longitude read out right in front of you. This would be important in an emergency
 |
| VHF on bottom, SSB above, hand held GPS top right |
When we had our boat hauled in South Carolina last fall, Ed did the repair on our boat. He also looked over the boat and gave Dave a couple recommendations. One was to move the furling drum further down the extrusion. The forward sail, jib sail, is wrapped around the extrusion, and the forestay is inside the extrusion. The furling drum wraps the line that helps unfurl and furl the sail from the cockpit.
Dave could see that the drum had worked it’s way up the aluminum extrusion from where it was originally positioned. There was a set screw that didn’t hold it in place. When he went to remove the stainless steel screw, he realized it had welded itself into the aluminum socket, which is normal on a boat. Since he would have to drill out the screw, he had to find another stainless steel/metric/course thread set screw. You would think that would be easy to find in the boating world. But he ended up finding one at an automotive fastener specialty warehouse. They normally furnish dealers and other stores. The guy wanted to sell him 100 screws. So Dave bought 2 and gave him a couple bucks for a soda for his trouble.
He had to find his tap and die set that was stored on the boat. He often wonders if he should even bring it with him. He drilled out the set screw. AND he drilled a hole into the extrusion to be a be to get the threads clean. He used his tap and die set to clean out the threads and recut them. He tried in the new screw and realized he needed to tap it further. This time the screw worked.
Now he needed to repair the hole he drilled into the extrusion. He used a pop rivet to fill the hole. It will also serve as a secondary stop to keep the drum from moving up again. Again, what should have been a simple job turned into many more steps and a scavenger hunt to find the screw he needed.
 |
| roller furler drum with red rope |
 |
| tap |
 |
| had to have a calm day to work on the furler with the sail out |

Lookie Bucket
Dave made a new “lookie bucket” for the Bahamas. This allows us to look over the side of the dinghy into the water as if you were wearing a dive mask. The old one succumbed to the wear and tear of the great sunshine in the Bahamas. He gets a 2 or 3 gallon bucket, cuts out the bottom leaving a lip, cuts plexiglass to sit in the bottom on top of the lip, seals it with butyl rubber tape. They're pretty cheap to make. They're hard to find, but dive shops sell them for $50 to $80.
 |
| ordinary small bucket from Home Depot |
 |
| view looking into the top |
 |
| view of the bottom |
Our solar panels were OVER charging our batteries which can destroy them. It’s normally in the 14.8 range and was going 15.3volts. He talked to the makers of the controller to explain what problem we were having and what we had on our boat. The person he was talking to put in the order for what we needed. BUT the person putting it in the box sent us the wrong one. Since we were leaving soon, Dave talked to them again to see if this one would work. He said it would, but with the size of our solar panels, it will over work this controller and eventually have to be replaced again. These aren’t cheap. So Dave sent it back and they happily refunded our money.
Now he called the company that sold us the solar panels in the first place, Northern Arizona
Wind and Sun. They talked him through making some adjustments on the controller. He retightened all the electrical connections and put corrosion control salve on the wires. There was a hot wire that was white that he painted red. Now we’ll wait and see if they work better. No one else seemed panicked about it, so I guess we don’t need to panic either.
 |
| Solar Panel Charge Controller - MPPT |
The valves on the control panels were either sticky or broken. Dave replaced the sea water and pickling selector controls which are on one panel. On the other panel, he replaced the needle valve. This adjusts the pressure in the high pressure pump. It controls the amount of water going through the membranes. Dave had noticed that the switches were working intermittently. After opening things up, he saw that the controls were getting wet. He had been tightening things, but continued to see the water. He decided to dig into this further while he had the time. He found that the needle valve and the tubing from the needle valve to the gauge were leaking and rusting. He ordered a new needle valve and tubing (project on hold in the galley).
The company sent him a pressure relief valve instead of the needle valve (on hold again).
The tubing he received wasn’t shaped like his old one, so he had to reshape it to fit behind the panel. That included moving other hoses. Afterwards, he sent the company a photo of what he had done. They didn’t remember making any water makers that had that configuration. He decided to send pictures with all his orders in the future.
 |
| controls mounted in our galley. the needle valve is the black knob on the far left |
 |
| metal tubing |
 |
| panels open and left that way until project was complete |
We had two membranes in storage. They are kept sealed and wet until you are ready to install them and put them to use. He had one installed when he found out the second one was dry. He called the company to see what he should do. They recommended he immerse the membrane in pickling solution. He put it back in it’s casing and let it soak. Since he had opened the first one, and now needed to wait, he removed it and added pickling solution to it, too. He was in the middle of this when I returned. The dining room table and the floor have to be removed to get to the membranes. This gave us an excellent excuse to get a room for a couple days before returning to the boat. He then placed both of the membranes after letting them soak overnight. Dave ordered 2 new membranes to keep in storage. The company recommended storing them in PVC pipes capped at each end to help keep them moist.
 |
| membranes mounted in place |
 |
| broken fitting photo for the company to order |
 |
| the membrane is inside this high pressure vessel and difficult to open and get it out. He had to take both caps off of the ends and "wap the snot out of it" |
Bimini and Dodger
When we returned to Brunswick in early December, we had a canvas company measure our boat for a new Bimini and Dodger, the canvas over the cockpit area. They said they would give us an estimate and would have plenty of time to do the work by the end of January. Dave called them and left messages several times early January. By mid January, we finally got an estimate with all kinds of excuses. Now it was a little late to start. Dave decided to restitch all the zippers and make it another year with what we had.
He was able to do the stitching with our Sailrite sewing machine at our dining table. He also trimmed the isinglass around the zippers in the dodger. They will work better than they have for the last year. Before putting them back on, we washed them and adding water proofing. Since they are so big, he decided to put home in contractor bags to soak overnight. Dave had ordered extra strong contractor bags online and pulled them out for the first time. Half the bags had seams that tore right open. He let the company know exactly how he felt about that. He had to go to Home Depot for strong bags and finally got them soaking. (This is why it was handy to hang on to the rental car during the project phase.) He draped them over the hand railings at our dock to dry. Then he put the water proof liquid into a spray bottle to coat them again. Towards the end, the spray bottle quit working. Always something.
 |
| It's quite a production to take off the bimini and still support the solar panels |

 |
| the canvas usually hold the bars of the framework together. So we have to tie the framework together to support the solar panels while the canvas is down. |
 |
| I help where I can |

Buffed the Hull
Dave had to put the dinghy in the water to get to the bow of the boat to clean it. When boats are on the ICW, the tannins in the water leave a “brown mustache” on the hull at the bow. Dave had to run an extension cord out of the boat and into the dinghy to power a grinder with a buffing wheel. We end up doing this a couple times a year. I remember being in South Carolina last summer at a peaceful anchorage. Another boat anchored in the same area. The wife immediately got into their dinghy, went out to the bow and wiped it off. We wish we had those cleaning genes, but sadly, we don’t. And we’re not sure we would want them. We sure wouldn’t be as relaxed as we are.
 |
| mustache on bow, this was taken in November when the boat was out of the water in SC |
No comments:
Post a Comment